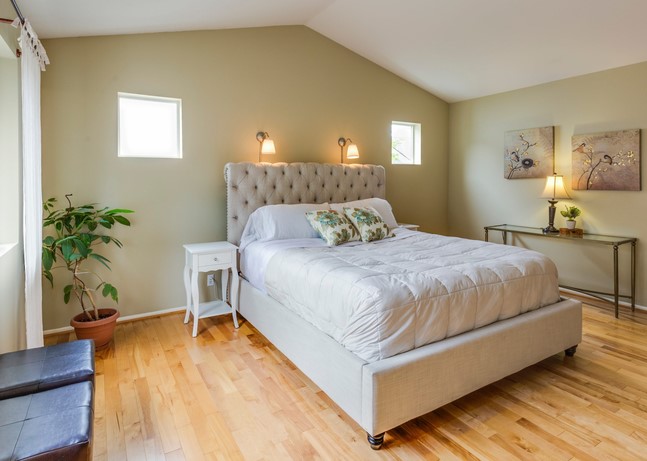
I still remember stepping into a client’s freshly renovated bedroom a few years back. The walls were freshly painted, the hardwood floors gleamed under warm lighting, but something felt completely off. Against the expansive accent wall sat a bare mattress with a minimalist metal frame—cold, uninviting, and utterly lacking character.
When I suggested adding a plush, classic tufted headboard, the homeowner shuddered at the price tag. Retail showroom versions easily ran anywhere from $800 to over $2,000 for high-end upholstery. That was the moment we decided to pivot to a hands-on approach: building it ourselves in a single afternoon for a fraction of that cost.
Creating a custom headboard isn’t just an afternoon craft project; it’s an exercise in sustainable asset creation. By sourcing quality materials, choosing durable textiles, and constructing the core yourself, you elevate your bedroom aesthetics while retaining real financial equity in your home furnishings.
The Financial and Aesthetic Math: Why DIY Beats Retail
When you purchase mass-produced furniture from high-street retailers, a massive portion of the price tag covers international freight, showroom overhead, and brand markup. The structural integrity of those pieces is often compromised, relying on cheap particleboard and low-density foam that sags within two years.
Executing a tufted headboard DIY flips this dynamic entirely. You control every single input, ensuring high-density cushioning, solid wood substrates, and commercial-grade upholstery fabric.
+-----------------------------------------------------------------------+
|                        COST & VALUE BREAKDOWN                         |
+--------------------------+---------------------+----------------------+
| Feature                  | Retail Showroom     | Custom DIY Project   |
+--------------------------+---------------------+----------------------+
| Frame Substrate          | Particleboard / MDF  | 3/4" Cabinet Plywood |
| Foam Core Density        | Low (1.2 lb/cu ft)  | High (1.8–2.8 lb)    |
| Fabric Quality           | Standard Polyester  | Heavy Linen / Velvet |
| Average Cost             | $800 – $2,200       | $130 – $220          |
| Lifespan Expectation     | 2 – 4 Years         | 10+ Years            |
+--------------------------+---------------------+----------------------+
By investing roughly $150 in raw materials, you construct a piece equivalent in structural quality to bespoke furniture pieces priced upwards of $1,200. That is an instant return on investment that aligns perfectly with sustainable home improvement.
Core Components and Essential Tool Kit
Before making a single cut, you need to assemble the right toolkit. Think of your materials as building blocks—if your foundation is weak, the entire structure suffers over time.
Required Materials
-
Substrate: 3/4-inch interior grade plywood (cut to your bed frame width plus 2–4 inches for overlap).
-
Cushioning: 2-inch or 3-inch high-density polyurethane upholstery foam (1.8 lb density rating minimum).
-
Padding Layer: 6 oz polyester upholstery batting.
-
Face Fabric: Heavyweight upholstery fabric such as cotton canvas, Belgian linen, velvet, or performance microfiber.
-
Tufting Supplies: Waxed upholstery thread, a 6-inch upholstery needle, 7/8-inch button covers, and 2-inch washers.
Essential Tools
-
Power drill with a 3/16-inch wood drill bit and hole saw attachment.
-
Heavy-duty pneumatic or manual staple gun with 3/8-inch and 1/2-inch staples.
-
Bread knife or electric foam cutter.
-
Fabric shears and spray adhesive (high-tack formula).
Step-by-Step Blueprint: Building Your Tufted Headboard
Building a professional-grade tufted headboard requires a methodical approach. Follow this step-by-step workflow to ensure your finished piece looks tailor-made rather than homemade.
       [ STEP 1 ]             [ STEP 2 ]             [ STEP 3 ]             [ STEP 4 ]
+----------------------+   +--------------+   +----------------------+   +----------------------+
| Layout & Grid Pattern|-->| Foam & Base  |-->| Diamond Folding &    |-->| Back Securing &      |
| Drilling             |   | Adhesion     |   | Deep Tufting Threading|  | Flush Mounting       |
+----------------------+   +--------------+   +----------------------+   +----------------------+
Step 1: Geometry and Grid Layout
The secret to a stunning tufted headboard DIY lies in symmetrical geometry. Lay your plywood flat on a pair of sawhorses. Measure your borders carefully—leave a 3-inch clearance on top and sides.
Using a straightedge and carpenter’s square, draft a diamond or square grid pattern. Space your grid intersection points roughly 6 to 8 inches apart. Once your grid is marked, use your drill to bore 3/16-inch holes through each intersection point. These holes will serve as the anchor points for your upholstery needle.
Pro Tip: Always drill your tufting holes before applying the foam. Attempting to drill through foam from the back later will tear the foam interior and create messy, uneven channels.
Step 2: Foam Bonding and Hole Transfer
Lay your high-density foam over the front side of the plywood. Coat both the wood and the foam backing with high-tack spray adhesive, allowing it to tack up for 60 seconds before pressing them firmly together.
Once the adhesive cures (around 10 to 15 minutes), flip the board over. Take a long nail or small wooden dowel, push it from the back through your drilled holes, and push through the foam layer. Use a foam hole cutter or bread knife to hollow out small 1/2-inch divots in the foam over each hole. This clearance allows your buttons to sink deep into the cushioning.
  [ FABRIC LAYER ]  ============================================
  [ BATTING LAYER ] ~~~~~~~~~~~~~~~~~~~~~~~~~~~~~~~~~~~~~~~~~~~~
  [ FOAM LAYER ]    ============================================
  [ PLYWOOD BASE ]  ============================================
                          ^                     ^
                      [ Tuft Hole ]         [ Tuft Hole ]
Step 3: Layering Batting and Upholstery Fabric
Wrap the entire front face and edges of the foam with polyester batting. Secure the batting loosely to the back of the plywood using your staple gun. The batting creates soft, rounded contours and prevents the upholstery fabric from grinding directly against the foam matrix.
Drape your main upholstery fabric over the assembly, leaving at least 6 to 8 inches of excess fabric on all four sides to account for the depth pulled by the tufts.
Step 4: Mastering the Deep Diamond Tuft
Now comes the transformative phase. Start pulling your tufts from the top-center hole and work your way outward in a V-shape pattern.
-
Thread your 6-inch upholstery needle with a doubled 24-inch strand of waxed upholstery thread attached to your fabric-covered button.
-
Push the needle from the front face through the fabric, batting, foam, and plywood hole.
-
On the back side of the plywood, pull the thread taut until the button sinks deep into the foam, creating a plush diamond recess.
-
Anchor the thread on the back by threading it through a metal washer, pulling it extremely tight, and stapling the excess thread down in a zig-zag pattern.
-
Form clean, crisp fabric folds between each button by manually tucking excess fabric into neat, uniform diagonal pleats.
Expert Advice: Avoiding Common Pitfalls
Over a decade of working with custom upholstery has taught me that simple mistakes during preparation can ruin an otherwise brilliant project.
Hidden Warning: Never use standard sewing thread or basic cotton yarn for deep tufting! The tension required to pull buttons deep into high-density foam will snap cheap thread inside the headboard over time. Always use waxed upholstery thread or bonded nylon line rated for heavy tension.
Here are a few quick structural rules to keep your build flawless:
-
Fabric Weight Matters: Avoid thin printed cottons or stretch synthetic knits. They puckering around tuft buttons and wear through rapidly. Stick to fabrics rated over 30,000 double-rubs (Wyzenbeek method).
-
Foam Density over Thickness: A 2-inch layer of high-density foam (1.8 lb/cu ft) performs significantly better than a 4-inch layer of low-density packing foam, which compresses permanently within months.
-
Maintain Consistent Tension: Keep an assistant on the back side of the board to check tuft depth visually as you secure each button. Inconsistent tension results in an uneven, wavy surface texture.
Secure Installation and Wall Mounting
A heavy, custom-built upholstered headboard requires robust mounting hardware. Do not rely on flimsy picture-hanging wire or basic screw hooks.
The most secure, professional method for wall-mounting a heavy headboard is a French Cleat system (interlocking aluminum or hardwood brackets).
 WALL SIDE CLEAT                HEADBOARD SIDE CLEAT
  |                             |
  |---\  <-- 45-degree angle -->|---/
  |    \                        |  /
  |     |                       | |
[ Anchor ]                  [ Frame ]
-
Attach one side of the cleat horizontally across the back of your plywood headboard using heavy woodworking screws.
-
Mount the matching cleat securely into the wall studs using drywall anchors and 3-inch lag screws.
-
Lower the headboard onto the wall mount; the interlocking 45-degree angles create a flush, rock-solid fit that distributes weight evenly across the wall studs.
Longevity, Care, and Maintenance
Maintaining a custom tufted headboard DIY project requires minimal ongoing effort, ensuring your investment remains in pristine condition for decades.
-
Dust Control: Vacuum the tuft recesses bi-weekly using a soft brush attachment to prevent household dust and allergens from setting into the fabric folds.
-
Spill Response: Blot liquid spills immediately with a clean, dry microfiber cloth. Avoid rubbing, which pushes moisture deeper into the underlying batting layer.
-
Fabric Protection: Treat non-velvet woven fabrics with a high-quality fabric protector spray upon completion to guard against oil transfer from pillows or hair products.
Elevate Your Space Today
Building your own tufted headboard bridges the gap between smart financial strategy and bespoke interior design. By taking control of the construction process, you eliminate retail markups, reduce material waste, and craft a durable piece tailored specifically to your home’s aesthetic.
Have you tackled a custom upholstery project before, or are you preparing to build your first headboard this weekend? Drop your questions, fabric selection ideas, or project photos in the comments below—I’d love to help you troubleshoot your build!
