There’s something magical about sitting around a fire pit with friends and family, the flickering flames casting a warm glow while everyone enjoys good conversation and a relaxed atmosphere. If you’ve ever dreamed of having your own cozy outdoor gathering spot, DIY fire pits are a fantastic way to create that experience in your own backyard. Building a fire pit not only adds a focal point to your outdoor space but also increases the usability of your yard, allowing you to entertain guests, enjoy quiet evenings, or even cook s’mores. Best of all, creating your own fire pit can be an affordable and rewarding project that adds both function and beauty to your outdoor area.
In this article, we will explore the benefits of having a fire pit, the materials and tools needed for creating your own, and provide step-by-step guidance on how to build a simple yet stunning fire pit in your backyard. Whether you’re a DIY enthusiast or just looking for a fun weekend project, a DIY fire pit is a great way to enhance your outdoor living space.
1. The Benefits of DIY Fire Pits
Before diving into the construction process, it’s important to understand the many benefits that come with having a fire pit in your backyard. A well-designed fire pit can transform your outdoor space and serve as a central hub for gatherings. Here are some of the key benefits of adding a fire pit to your outdoor space:
a. Extended Outdoor Seasons
A fire pit allows you to enjoy your outdoor space well into the cooler months. When the temperature drops, the warmth from the fire provides a cozy atmosphere, making it possible to continue hosting guests or simply relaxing outside during the fall and winter. Whether you’re roasting marshmallows in the summer or sipping hot cocoa in the winter, a fire pit can extend your outdoor season.
b. Improved Ambiance
A fire pit can dramatically improve the ambiance of your backyard. The soft flicker of flames and the inviting warmth draw people in, creating a natural, relaxing gathering spot. It can be the perfect place to unwind after a long day, enjoy a family night under the stars, or entertain guests in a laid-back atmosphere.
c. Versatile Functionality
DIY fire pits aren’t just for warmth. They can also serve as cooking stations, allowing you to grill or cook food over the open flame. Adding a cooking grate or skewer setup to your fire pit lets you prepare meals like hot dogs, skewers, or even pizza, making the fire pit an all-in-one outdoor cooking solution.
d. Increase Property Value
An outdoor fire pit is an attractive feature that can increase the overall appeal and value of your home. If you’re considering selling in the future, a well-built fire pit can be a selling point that sets your home apart from others, especially if it’s part of a beautifully designed outdoor living space.
2. Choosing the Right Location and Materials for Your DIY Fire Pit
When building a fire pit, selecting the right location and materials is crucial for both safety and aesthetics. Here are some tips to help you make the best decisions for your project:
a. Choosing the Right Location
Before you start building your fire pit, consider the following factors when selecting the location:
- Safety: Ensure that the fire pit is positioned away from overhanging trees, fences, or anything that could catch fire easily. A safe distance is at least 10-15 feet away from structures or flammable materials.
- Ventilation: Place your fire pit in an open area with good airflow. This helps ensure that smoke is dispersed and doesn’t linger too close to your seating area.
- Flat Surface: Make sure the ground is level where you plan to build your fire pit. A flat surface will make it easier to construct and ensure the pit is stable and safe to use.
- Aesthetic Considerations: Choose a location that complements your overall outdoor design. The fire pit should blend in with the natural surroundings and the rest of your backyard setup, whether it’s near a patio, garden, or outdoor seating area.
b. Selecting Materials
When it comes to building DIY fire pits, there are several material options available. The most common materials include:
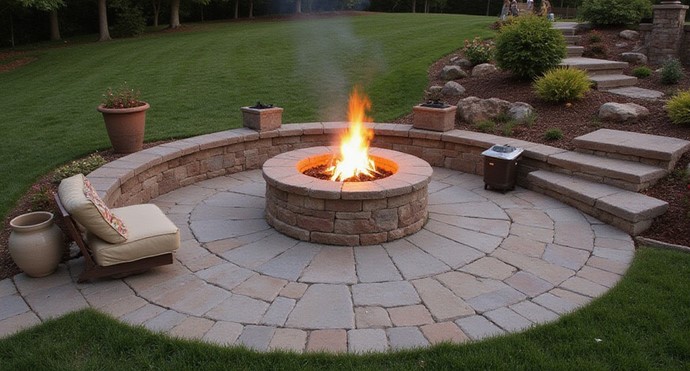
- Stone: Natural stone or masonry blocks are classic materials for fire pits. They are durable, heat-resistant, and provide a rustic, traditional look. You can choose from a variety of stones like flagstone, river rock, or even brick, depending on the aesthetic you want.
- Steel: Steel fire pits are another popular option. They are often more affordable and easier to assemble than stone models. Steel fire pits come in a variety of shapes and styles and can be portable, making them perfect for smaller spaces or temporary setups.
- Concrete: For a more modern look, you can use poured concrete or concrete blocks to build your fire pit. Concrete fire pits are incredibly durable and offer a sleek, contemporary design. You can also customize the shape and size of the pit to fit your space.
- Retaining Wall Blocks: For a DIY fire pit that’s easy to assemble, retaining wall blocks are an excellent option. These interlocking blocks can be stacked in a circular formation to create a stable and visually appealing structure.
Additionally, you will need a few other tools and materials, such as a shovel, level, gravel, fire pit ring (for added safety), and mortar (if using stone or brick).
3. Step-by-Step Guide to Building Your DIY Fire Pit
Once you’ve selected your materials and chosen the location, it’s time to start building your DIY fire pit. Here’s a step-by-step guide to help you through the process:
a. Step 1: Mark the Area
Start by marking the area where you’ll be building the fire pit. Use a garden hose or string to create a circular outline for the pit. This will serve as your guide for digging and laying the foundation.
b. Step 2: Dig the Foundation
Using a shovel, dig a hole that’s about 6-8 inches deep. The depth will vary depending on the size of the fire pit you’re building. Make sure the hole is level and evenly shaped.
c. Step 3: Add a Gravel Base
Once the hole is dug, add a layer of gravel to the bottom. The gravel will help with drainage and prevent the pit from filling with water. Spread the gravel evenly across the base and tamp it down to create a solid foundation.
d. Step 4: Lay the First Row of Stones or Blocks
Start by laying the first row of stones or blocks along the outer edge of the marked circle. This row should be snugly fitted and level. If you’re using a fire pit ring, place it inside the circle as a guide and begin stacking the stones around it.
e. Step 5: Build Up the Layers
Continue stacking additional rows of stones or blocks, making sure each row is level. Depending on the size of your fire pit, you may want to build it up 3-5 rows high. Use mortar between stone layers if desired, but be sure the pit is structurally sound even without it.
f. Step 6: Add a Fire Pit Ring
For added safety, you can insert a fire pit ring inside the structure. This metal ring helps contain the flames and provides extra protection from heat damage.
g. Step 7: Final Touches
Once the fire pit is constructed, you can add finishing touches, such as decorative stones, pebbles, or even a seating area around the pit. Create a cozy ambiance with outdoor furniture like benches, chairs, or cushions, and you’ll have a perfect spot to gather with family and friends.
Building DIY fire pits is an enjoyable and practical way to create a cozy outdoor gathering space in your backyard. Not only do they enhance your outdoor experience by providing warmth and a focal point, but they also allow for customization, letting you design a fire pit that fits your space, budget, and style. By choosing the right materials, location, and design, you can create a fire pit that becomes the heart of your outdoor entertainment area. Whether you’re hosting a party or simply enjoying a quiet night, a DIY fire pit will bring your backyard to life and provide a lasting place to make memories.