I once spent four painful hours watching an eager homeowner try to patch a 4×4-foot section of a stippled ceiling using a drywall trowel and a sea sponge. He was trying to match the existing pattern, but the result looked like a topographical map of relief mountains right in the middle of his living room. Exhausted and covered in drying joint compound, he looked at me and asked, “Why does this look so patchy?”
The answer was simple: manual hand-troweling relies on variable human wrist pressure, which makes consistent, large-scale application virtually impossible. In my over ten years of hands-on drywall finishing, residential remodeling, and surface restoration, I’ve learned that achieving seamless, professional ceiling finishes isn’t about artistic talent—it’s about controlling mechanical delivery.
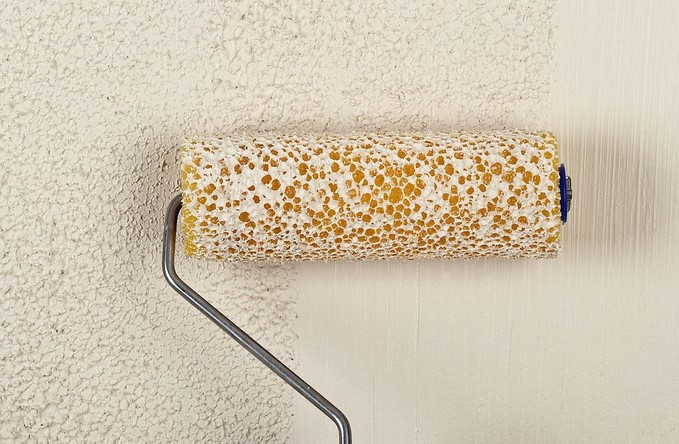
When you need to cover large overhead expanses with complete visual consistency, nothing matches the speed, repeatability, and control of a specialized ceiling texture roller.
The Physics of Overhead Viscosity: Why Standard Rollers Fail
To the untrained eye, a texture roller looks like a regular paint roller with a rougher cover. However, trying to apply heavy drywall joint compound with a standard 3/8-inch nap paint roller will quickly lead to a mess of splattering compound, heavy arm fatigue, and a completely flat, muddy surface finish.
Think of applying ceiling texture like rolling out dough for a pie crust. A standard paint roller acts like a smooth rolling pin that flattens everything down evenly. A ceiling texture roller, on the other hand, acts like a stamp roller with deep grooves cut into it—it lifts, pulls, and peaks the thick mud as it rotates, leaving a uniform three-dimensional pattern across the surface.
       STANDARD PAINT ROLLER                       CEILING TEXTURE ROLLER
    (Flattens compound / Smooth)               (Lifts & peaks mud / Patterned)

          ||      ||                                 ||      ||
          ||      ||                                 ||      ||
       +--+--------+--+                           +--+--------+--+
       |   SMOOTH NAP  |                          |  DEEP FOAM/  |
  ====>| (Flattens Mud)|====> Mud stays flat.====>|  PATTERNED   |====> Creates uniform
       |               |                          |  LOOPS/SLOTS |      raised peaks!
       +--------------+                           +--------------+
Rheology and Peak Formation
The key technical principle here is fluid rheology and mechanical tension. As the loop fabric or carved foam sleeve rolls over thinned joint compound (mud), the mud sticks to the pockets inside the roller sleeve. As the roller continues turning away from the ceiling board, it draws the compound upward, creating controlled tension peaks.
As the sleeve disengages from the drywall, the compound snaps back slightly, locking uniform stipple, crow’s-foot, or popcorn-style textures into place before gravity pulls them down.
Deciphering Sleeve Materials: Loop, Foam, and Rubber Patterns
Matching your roller sleeve material to your target finish is the most critical step in spatial texture planning. Using the wrong sleeve density will give you an uneven pattern or cause the compound to slump before drying.
+--------------------------------------------------------------------------+
|                     CEILING TEXTURE ROLLER SLEEVE                        |
|                                                                          |
|   /==================================================================\   |
|  | [===]  Heavy-Duty Reticulated Open-Cell Foam / Poly Loop [===]    |  |
|  |                                                                   |  |
|  |   /\/\/\   Patterned Grooves for Uniform Peak Lifting   /\/\/\    |  |
|  |  /      \                                              /      \   |  |
|   \==================================================================/   |
|      ||                                                           ||     |
|      ||  <- Heavy-Duty Steel Frame Core                           ||     |
+--------------------------------------------------------------------------+
1. Loop (Spaghetti) Texture Rollers
Crafted from heavy-duty looped plastic or metal strands, these sleeves are designed to pick up thick, high-viscosity joint compound.
-
Best For: Classic stipple finishes, orange peel textures, and heavy popcorn-style ceilings.
-
Key Advantage: The rigid loops hold their structural shape even when saturated with heavy wet compound, ensuring consistent depth across hundreds of square feet.
2. Reticulated Open-Cell Foam Rollers
These sleeves feature precision-cut geometric patterns (such as diamond, tree bark, or basketweave) carved directly into high-density foam.
-
Best For: Decorative ceiling patterns and uniform knockdown base layers.
-
Key Advantage: Creates sharp, distinct geometric profiles with a single pass over freshly applied mud.
3. Hard Rubber Stamping Rollers
Heavy-duty molded rubber sleeves designed for fine decorative plasters and Venetian-style finishes.
-
Best For: Architectural feature ceilings and thin-set Venetian textures.
-
Key Advantage: Highly durable, extremely easy to wash, and immune to tearing on rough drywall paper edges.
Technical Slump & Viscosity Matrix: Preparing Your Joint Compound
The biggest mistake DIYers make with a ceiling texture roller is using joint compound straight out of the bucket. Off-the-shelf pre-mixed joint compound is far too thick; it will pull off the drywall tape and leave heavy, unsightly blobs.
| Texture Profile | Viscosity Target (Consistency) | Water Add Ratio (Per 5-Gal Bucket) | Ideal Sleeve Type |
| Heavy Stipple / Artex | Thick Pancake Batter | 2 to 3 Cups Water | Heavy Poly Loop Sleeve |
| Medium Orange Peel | Heavy Cream / House Paint | 4 to 6 Cups Water | Medium Open-Cell Foam Sleeve |
| Knockdown Base | Warm Cake Batter | 3 to 4 Cups Water | Deep Cut Foam / Loop Sleeve |
| Fine Scroll Pattern | Smooth Yogurt | 2 to 4 Cups Water | Molded Rubber Pattern Roller |
Pro Tip: Mix your compound thoroughly using a high-torque 1/2-inch drill fitted with a spiral mixing paddle for at least 3 minutes after adding water. Let the mixture rest for 10 minutes (to allow air bubbles to escape), then re-mix for 60 seconds before pouring it into your roller tray. Trapped air bubbles create unwanted pinholes on your finished ceiling!
Step-by-Step Workflow: Achieving Uniform Pass-Over Speeds
Roller technique on a ceiling requires a steady, continuous rhythm to keep pattern depth uniform. Here is the field-tested technique I use with my crews on job sites:
+--------------------------------------------------------------------------+
|                       TWO-STAGE TEXTURING PROTOCOL                       |
|                                                                          |
|   +-------------------+      +-------------------+      +------------+   |
|   | 1. Base Layer     | ---> | 2. Texturing Pass | ---> | 3. Optional|   |
|   |    Distribution   |      |    (Single Direction)|   |    Knockdown|  |
|   | (Standard Nap)    |      | (Texture Roller)  |      |  (Trowel)  |   |
|   +-------------------+      +-------------------+      +------------+   |
+--------------------------------------------------------------------------+
Step 1: Base Layer Distribution
Do not attempt to scoop wet, heavy compound directly from a pan using your ceiling texture roller. First, use a standard 1/2-inch nap paint roller or a wide drywall knife to spread an even 1/8-inch layer of thinned mud across a 4×4-foot ceiling section.
Step 2: The Texturing Pass
Immediately take your pre-dampened ceiling texture roller mounted on a sturdy fiberglass extension pole and roll through the wet mud in one continuous direction. Maintain light, consistent upward pressure—let the texture sleeve do the work of lifting the peaks rather than pushing the mud into the ceiling board.
Step 3: Overlap with Precision
Overlap each parallel roller path by roughly 1 to 2 inches. To keep line marks from showing up along the edges, slightly angle the roller frame so that more pressure sits on the inside edge while the outside edge floats lightly across the wet compound.
Expert Advice: Hidden Pitfalls to Avoid
Working overhead with heavy wet materials leaves very little room for error. Keep these two warnings in mind before starting your project:
Hidden Pitfall 1: Over-Working the Wet Mud
If a pass doesn’t look completely perfect on the first try, resist the urge to roll back and forth over the same spot five times. Over-working thinned joint compound introduces excess air, tears the paper backing on your drywall, and flattens out the raised pattern peaks you are trying to create. Make one confident pass, overlap the edge, and move on.
Hidden Pitfall 2: Skipping Wall-to-Ceiling Primer
Never apply wet textured joint compound directly onto bare drywall or unprimed patch repair work. The dry paper face of the drywall will suck moisture out of the wet mud unevenly (a phenomenon known as “flashing”). This causes the texture to dry brittle, flake off, and look patchy. Always seal the entire ceiling with a quality PVA drywall primer before rolling on your texture.
Transform Overhead Spaces with Professional Precision
Texturing a ceiling doesn’t have to be a messy, frustrating experiment in trial and error. By controlling your mud viscosity, selecting the proper sleeve material, and mastering a two-pass application technique, a simple ceiling texture roller lets you cover entire rooms quickly while maintaining professional-grade pattern uniformity.
Take a moment to evaluate your project ceiling this week. Are you planning a quick spot patch or transforming an entire room from flat to textured?
Have you ever tried applying or matching a ceiling texture at home? Drop your DIY renovation stories or questions in the comments below, and let’s troubleshoot your ceiling project together!
