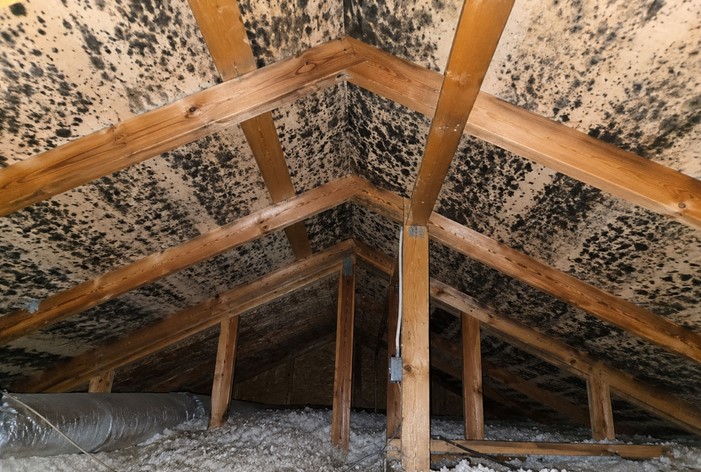
I’ll never forget climbing into a client’s attic in early March a few years back. The home looked pristine from the curb, but the moment I popped open the access hatch, I was hit with a wall of heavy, damp air and a distinctly earthy, musty odor. Shining my flashhead up at the roof rafters revealed a nightmare: pitch-black velvet-like fungal growth coating almost the entire northern plywood decking.
The homeowner was shocked, assuming that because their roof wasn’t actively leaking water, the attic space was safe. What they didn’t realize is that elevated relative humidity and trapped thermal vapor create an ideal incubator for fungal spores.
Left unchecked, attic fungal growth compromises roof decking structural integrity, degrades air quality, and erodes thousands of dollars in home equity. Understanding professional-grade attic mold treatment protocols allows you to tackle fungal contamination head-on while permanently eliminating the moisture sources that feed it.
Root Causes: Why Fungal Growth Thrives in Attics
To effectively treat attic mold, you must first understand why it appears. Mold spores exist naturally everywhere in the environment, but they require three specific triggers to colonize: organic material (plywood, rafters), continuous moisture (relative humidity above 60%), and stagnant air movement.
When moist household air rises through unsealed ceiling penetrations—a physical phenomenon known as the stack effect—it becomes trapped under the cold roof deck during winter months. Without adequate ventilation, that water vapor condenses directly on wood substrates, creating a prime feeding ground for species like Aspergillus, Penicillium, and Cladosporium.
+-----------------------------------------------------------------------+
|                    ATTIC MOISTURE SOURCE BREAKDOWN                    |
+--------------------------+---------------------+----------------------+
| Primary Moisture Source  | Mechanism           | Risk Level           |
+--------------------------+---------------------+----------------------+
| Bathroom Exhaust Vents   | Venting into Attic  | Severe / Direct      |
| Unsealed Attic Hatch     | Thermal Stack Effect| High / Continuous    |
| Clogged Soffit Baffles   | Restricts Air Intake| Moderate / Seasonal  |
| Roof Sheathing Leaks     | Water Intrusion     | Severe / Localized   |
+--------------------------+---------------------+----------------------+
Think of your attic like a human lung. If the soffit vents (inhalation) or ridge vents (exhalation) get blocked, the house stops breathing, trapping ambient moisture inside and causing fungal decay.
Evaluating Treatment Protocols: DIY vs. Professional Intervention
Before grabbing a sprayer, you must accurately assess the total surface area of contamination. The scale of the outbreak determines whether this is a manageable weekend DIY remediation or a job for certified environmental contractors equipped with negative air machines.
                  ATTIC CONTAMINATION ASSESSMENT
                                 |
                 /-------------------------------\
                |                                 |
    [ Under 10 Sq. Ft. ]              [ Over 30 Sq. Ft. ]
                |                                 |
      ( DIY Remediation )               ( Professional HEPA )
      ( Spot Treatment  )               ( & Containment     )
-
Minor Contamination (Under 10 Sq. Ft.): Suitable for confident DIYers using professional EPA-registered antimicrobials, proper personal protective equipment (PPE), and manual scrubbing tools.
-
Moderate to Heavy Contamination (Over 30 Sq. Ft.): Requires negative air pressure containment, HEPA air scrubbing, and industrial media blasting (such as dry-ice abrasive blasting) to remediate deep hyphae roots safely.
Comprehensive Step-by-Step Attic Mold Treatment Standard
If you are addressing localized fungal growth, following a standardized technical protocol ensures safety and prevents spores from cross-contaminating your living spaces below.
       [ STEP 1 ]             [ STEP 2 ]             [ STEP 3 ]             [ STEP 4 ]
+----------------------+   +--------------+   +----------------------+   +----------------------+
| Isolation, PPE &     |-->| Antimicrobial|-->| Mechanical HEPA      |-->| Encapsulation &      |
| Negative Pressure    |   | Application  |   | Agitation Scrubbing  |  | Ventilation Repair   |
+----------------------+   +--------------+   +----------------------+   +----------------------+
Step 1: Isolation and Personal Safety Prep
Never enter a mold-contaminated attic without full personal protection. Wear a fit-tested N95 or P100 respirator, unvented safety goggles, and a disposable Tyvek suit with integrated hood and booties.
Isolate the attic access hatch using 6-mil polyethylene sheeting. Place a box fan pointing out an attic gable window to establish negative air pressure, ensuring loose spores vent outdoors rather than migrating into bedrooms.
Step 2: Chemical Antimicrobial Application
Avoid standard chlorine bleach—it lacks the surface tension to penetrate porous wood fibers, leaving water behind that actually feeds sub-surface mold roots. Instead, use an EPA-registered quaternary ammonium compound or a concentrated hydrogen peroxide-based antimicrobial.
Apply the solution evenly across affected roof sheathing and rafters using a pump sprayer. Allow a minimum dwell time of 15 to 20 minutes to break down cell walls and neutralize surface fungal colonies.
Step 3: Mechanical Agitation and HEPA Vacuuming
Chemical application alone is not enough; dead mold spores remain allergenic and must be physically removed.
-
Use stiff-bristled nylon scrub brushes to physically dislodge embedded fungal structures from timber grain.
-
Once the surface dries completely, vacuum all wood surfaces, rafter bays, and floor insulation using a vacuum fitted with a true HEPA filter.
Pro Tip: Work from the furthest gable end back toward your exit hatch. This prevents you from tracking loose fungal spores across freshly cleaned sections of roof decking.
Step 4: Applying Mold-Resistant Encapsulants
Once the wood substrate moisture content drops below 16% (verify this using a pin-type moisture meter), apply a clear or white antimicrobial elastomeric coating. This protective sealant encapsulates remaining microscopic fragments and inhibits future spore germination on treated timbers.
Expert Advice: Critical Pitfalls and Pro Guidelines
Over a decade in home inspection and structural remediation has taught me that applying chemicals without fixing ventilation guarantees mold will return the following winter.
Hidden Warning: Never spray bleach on bare wooden rafters! Chlorine cannot penetrate porous wood; only the liquid water vehicle gets absorbed, driving moisture deeper into the grain and accelerating fungal growth long-term.
Keep these core operational principles in mind throughout your project:
-
Clear the Soffits: Ensure fiberglass insulation battings aren’t pressed tightly against lower roof eaves. Install rigid PVC or cardboard rafter baffles to maintain an open air channel from soffit vents up to ridge vents.
-
Redirect Exhaust Ducts: Inspect bathroom fan exhaust flex-ducts immediately. They must terminate directly outdoors through roof caps or exterior sidewalls—never loose inside the attic space.
-
Monitor Substrate Moisture: Invest in an inexpensive digital moisture meter. Never seal or coat wood decking if internal wood moisture reads above 18%, as trapped moisture causes structural dry rot behind the sealant layer.
Post-Remediation Maintenance and Troubleshooting
Maintaining long-term structural safety requires keeping a close eye on attic environmental conditions throughout changing seasons.
+---------------------------------------------------------------------------------+
|                        ATTIC REMEDIATION TROUBLESHOOTING                       |
+----------------------+--------------------------+-------------------------------+
| Symptom Observed     | Underlying Cause         | Corrective Action             |
+----------------------+--------------------------+-------------------------------+
| Frost on Under-side  | Inadequate Ventilation / | Install rafter baffles; seal  |
| of Plywood Sheathing | Warm Air Leaks from House| attic hatch weatherstripping  |
| Persistent Musty Odor| High Wood Moisture /     | Run commercial dehumidifier;  |
| Post-Chemical Spray  | Incomplete Drying        | check for hidden roof leaks   |
| Mold Re-Appearing    | Active Exhaust Leak into | Reroute bath fan flex-ducts   |
| on North Decking     | Unvented Eaves           | directly through roof cap     |
+----------------------+--------------------------+-------------------------------+
Inspect your attic space twice a year—once during peak winter heating months and once during mid-summer. Watch for localized condensation, dark wood discoloration, or crushed insulation baffles to stop moisture issues before mold takes hold again.
Protect Your Home’s Health and Asset Value
An effective attic mold treatment strategy requires more than just masking surface discoloration; it demands a systematic approach that combines personal safety, proper chemistry, mechanical cleaning, and permanent ventilation control. By addressing both existing growth and underlying humidity, you preserve your roof structure and maintain a safe, healthy living environment for years to come.
Are you currently planning an attic inspection or troubleshooting a ventilation issue in your home? Drop your questions or current project setups in the comments section below—I’d love to help you diagnose your space!
