It starts as a charming, subtle tint of green along the edges of your shingles. Most homeowners look up and think it gives their property a cozy, fairytale cottage vibe. But let me tell you what I see after ten years of climbing up onto residential rooflines: I see a ticking financial time bomb. I once had to tell a heartbroken couple that their beautiful 7-year-old architectural shingle roof—which should have easily lasted another twenty years—was completely structurally compromised.
The culprit wasn’t a freak storm or a manufacturing defect. It was thick, unchecked moss that had transformed their roof into a giant, rotting sponge.
When dealing with property maintenance, ignoring biological growth is one of the costliest mistakes you can make. Understanding how to deploy a targeted roof moss killer isn’t just about preserving your home’s curb appeal; it is a critical exercise in chemical mitigation designed to protect your home’s envelope from devastating structural failures.
The Biological Threat: How Moss Destroys Your Shingles
To understand why chemical intervention is necessary, you have to realize that moss is fundamentally different from simple surface stains like algae. Moss is an aggressive, root-like plant organism that thrives in dark, damp, and shaded environments.
The Mechanism of Destruction
Think of moss on a roof like a series of tiny wedges driven between your shingles. Moss doesn’t have true roots; instead, it utilizes small anchoring filaments called rhizoids to lock itself onto the rough mineral granules of your asphalt shingles.
As the moss clumps grow, they physically lift the leading edges of the shingles upward, breaking the manufacturer’s factory adhesive seal. Once a shingle is lifted, it acts like an open door for water. Rainwater backing up behind the moss colony gets forced underneath the shingles, rotting the underlying plywood decking, degrading the underlayment, and eventually leaking into your attic insulation.
The Freeze-Thaw Explosion
During the winter months, this biological sponge becomes even more dangerous. The thick moss pads absorb and hold onto water like a heavy towel.
When freezing temperatures hit, that trapped water expands as it turns into ice. This expansion exerts intense mechanical pressure on the asphalt matrix, literally cracking the shingles and tearing away the protective UV granules. Without those granules, your shingles quickly bake, dry out, and crumble under normal sunlight.
The Chemical Matrix: Choosing the Right Roof Moss Killer
When you walk down the aisle of a home improvement store, you’ll be confronted with an overwhelming wall of chemical options. Choosing the wrong formula can end up killing your lawn, corroding your aluminum gutters, or permanently bleaching your roof’s color.
Zinc Sulfate vs. Biodegradable Surfactants
Historically, professionals relied heavily on heavy-metal compounds like zinc sulfate. While highly effective at stripping away plant matter, zinc runoff is incredibly toxic to local aquatic ecosystems and can severely burn the landscaping surrounding your foundation.
Modern chemical mitigation has evolved toward biodegradable surfactants and non-corrosive, advanced formulas. Look for products containing alkyl dimethyl benzyl ammonium chloride or specialized copper complexes. These targeted LSI compounds work by disrupting the cellular walls of the moss upon contact, killing the plant instantly while remaining completely safe for your roofing components, metal gutters, and surrounding vegetation once dried.
Step-by-Step Mitigation Protocol: Applying Moss Killer Safely
Applying a roof moss killer is a precise technical process. If you rush onto your roof with a pressure washer, you will cause more damage in thirty minutes than the moss would have caused in three years. High-pressure water will instantly strip the protective granule coating right off your shingles, shortening their lifespan drastically.
Step 1: Gentle Mechanical Pre-Preparation
Never attempt this on a windy or boiling hot day; you want the chemical mixture to stay wet on the roof as long as possible so it can soak deep into the plant’s root structure.
-
Set up a stable extension ladder and put on a high-traction safety harness.
-
Using a soft-bristled scrub brush or a plastic roof rake, gently brush away the large, loose chunks of moss.
-
Always brush downward in the direction of the shingle overlap so you don’t accidentally pry the shingles upward.
Step 2: Calibrating the Chemical Mix
Most commercial formulas come in a concentrated liquid format that requires precise dilution.
[The Mitigation Application System]
Water / Chemical Concentrate Tank
       ↓
Low-Pressure Pump Sprayer (Set to 30-40 PSI)
       ↓
Thorough Saturation of Moss Colony (Top-to-Bottom)
       ↓
The Active "Kill Phase" (No rinsing required for self-cleaning formulas)
       ↓
Natural Weathering (Rain washes away dead root structures over 2-3 weeks)
-
Mix your chosen roof moss killer in a standard garden pump sprayer according to the technical data sheet instructions.
-
Set your nozzle adjusting spray to a coarse droplet setting. Avoid fine mists that can easily blow back into your face or onto your neighbor’s property.
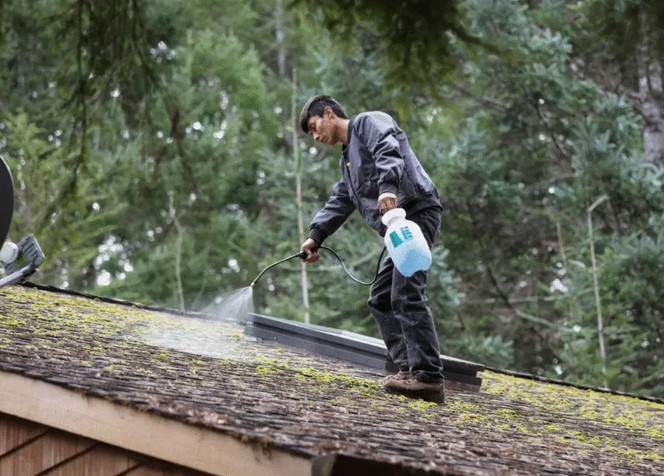
Step 3: Strategic Saturation
Start at the highest point of the roof section and work your way down. Saturate the moss colonies completely until they are dripping wet. Pay close attention to the horizontal keyways—the gaps between shingles—as this is where the rhizoids take their deepest anchor hold.
Once applied, do not rinse the product off. Modern formulas are engineered to be left in place; they slowly break down the organic matter over several weeks, allowing subsequent rainstorms to naturally wash away the dead, withered debris.
Expert Advice from the Field
After a decade of diagnosing roof system failures, I’ve developed a few strict rules that save my clients thousands of dollars in collateral damage.
Beware of the Bleach Shortcut
Many intermediate DIYers try to save money by mixing up a heavy concentration of standard household chlorine bleach to spray on their roof. While bleach will whiten and kill the moss quickly, it is highly corrosive. It will aggressively attack the galvanized roofing nails holding your shingles down, rot out the rubber boots surrounding your plumbing vent pipes, and leave white, streaky bleach stains across your fascia boards.
💡 Expert Pro-Tip: The Preventive Zinc/Copper Strip Trick
Once you have successfully purged the active biological infestation with a liquid roof moss killer, you need a passive strategy to ensure it never returns. Install a 2-inch wide strip of bare zinc or copper flashing along the entire length of your roof ridges. When rainwater washes over these metallic strips, it leaches trace amounts of metallic ions down the roof face. These ions create a microscopic, invisible hostile environment that completely prevents moss spores from ever taking root again.
Structural Performance: Mitigation Strategy Comparison
| Operational Metric | High-Pressure Washing (AVOID) | Bleach-Based Solutions | Advanced Surfactant Moss Killer |
| Granule Retention | Extremely Poor (Strips protective layer) | Moderate | Excellent (Zero mechanical friction) |
| Environmental Safety | High | Poor (Kills landscaping & grass) | High (Eco-friendly, biodegradable) |
| Residual Protection | Zero (Moss returns quickly) | Low | High (Inhibits spore growth for months) |
| Hardware Corrosivity | Zero | Severe (Rusts flashing and fasteners) | Zero (Completely non-corrosive) |
| Labor Effort Required | Exhausting / Dangerous | Moderate | Low (Spray on and leave it) |
Conclusion: Protect Your Overhead Investment
Your roof is the ultimate shield protecting everything you own from the elements. By approaching property maintenance through a lens of chemical logic and using a targeted roof moss killer, you break the cycle of biological decay before it can cause thousands of dollars in deep structural rot. It is an easily scannable, budget-friendly weekend task that ensures your structural envelope remains secure, solid, and dry for decades to come.
Are you noticing the early warning signs of green growth creeping up your roofline? What type of shingles are you currently working with? Share your home’s roof pitch or your local climate challenges in the comments below—let’s make sure your home stays fully protected!