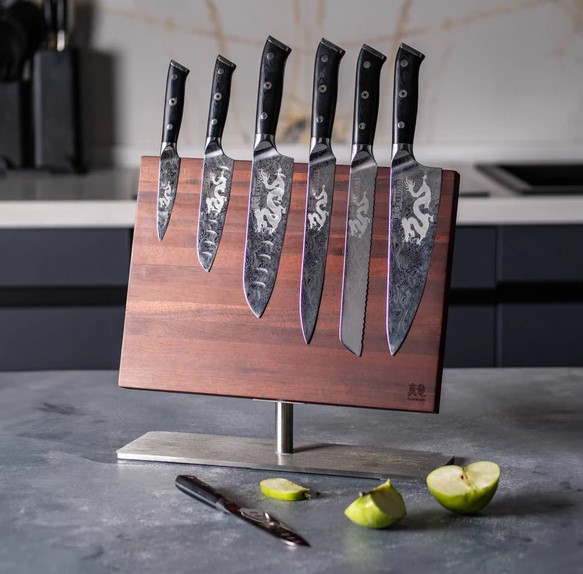
A few years ago, I was remodeling a kitchen for a passionate home cook who had just invested over $1,000 in a premium set of Japanese forged steel cutlery. Less than six months later, she called me back because her beautifully renovated quartz countertops were getting scratched, and her prized chef’s knife had a glaring chip near the heel. The reason wasn’t poor culinary technique; it was a chaotic “utility drawer” where loose blades violently clattered against metal measuring cups and metal tongs every time the drawer slammed shut.
In both high-end kitchen remodeling and culinary logistics, how you store your tools dictates how long they survive. A study on kitchen ergonomics reveals that improper storage accounts for up to 40% of premature blade dulling and micro-chipping.
Your blades are precision instruments, not random garage tools. To maintain their edge and elevate your kitchen workflow, implementing a systematic organization plan centered around a high-quality knife block is one of the smartest upgrades you can make.
The Physics of an Edge: Why Loose Drawers are Knife Killers
To appreciate why a dedicated storage system matters, let’s look at the microscopic reality of a blade edge. To the naked eye, a knife edge looks like a solid, smooth sheet of metal. Under a microscope, however, that edge is an incredibly thin, delicate apex of aligned steel fibers.
Think of a pristine blade edge like a row of perfectly straight dominoes. When you toss that knife into a drawer, every impact with another object knocks those dominoes out of alignment. This flattening or bending of the steel matrix is what causes a blade to feel dull, requiring frequent hone or grind cycles that shave away its lifespan.
Pristine Cutting Edge (Aligned Steel Matrix)
^   ^   ^   ^   ^   ^   ^   ^

Dammed/Dulled Edge (Impact from Loose Drawer Storage)
~   _   ^   \   /   _   ~   ^
Deploying a properly engineered knife block eliminates this structural degradation. By physically isolating each blade in its own secure slot or magnetic channel, you eliminate metal-on-metal collision, protecting the apex and preserving its cutting geometry.
Selecting Your Countertop Armor: Material Types and Configurations
Not all storage blocks are created equal. Over my decade in the home improvement space, I have seen homeowners choose blocks based purely on color, completely ignoring the structural composition and its effect on blade metallurgy.
1. Traditional Hardwood Blocks
The classic counter centerpiece is usually milled from tight-grained hardwoods like beech, rubberwood, oak, or walnut. Hardwoods are naturally resilient, providing a gentle docking environment that won’t scratch carbon steel or stainless steel alloys.
-
Vertical Slotted Blocks: Space-saving, but they require you to insert blades carefully to avoid dragging the cutting edge against the wood.
-
Horizontal Slotted Blocks: The superior traditional design. Because the slots run horizontally, the blade rests on its flat spine or side rather than its razor-thin edge.
2. Universal Slotless Blocks (Plastic Bristles)
These utilize a shell filled with hundreds of tightly packed, food-grade plastic or silicone rods. They offer incredible flexibility because you can slide any knife of any width into any position. However, they lack the rigid structural support required for heavy cleavers and can be tricky to clean if debris drops to the bottom.
3. Magnetic Wood Blocks
The modern design standard. These feature powerful, hidden neodymium magnets embedded right beneath a gorgeous wood veneer face. They offer the stunning visual display of a magnetic wall strip but sit safely on your countertop, providing zero-friction storage where the blade edge never touches a tight enclosure.
Step-by-Step Culinary Organization: Mapping Your Countertop Logistics
Setting up your new knife block shouldn’t be random. Grouping your tools systematically optimizes your kitchen’s mechanical efficiency and keeps your most dangerous tools within arm’s reach.
       [ Ideal Slot Placement Map ]
+------------------------------------------+
|  [Slot 1: Chef's Knife / Santoku]        | <- Most Frequent Use (Dominant Side)
|  [Slot 2: Bread / Serrated Knife]        |
|  [Slot 3: Utility / Boning Knife]        |
|  [Slot 4: Paring / Petty Knife]          | <- Lowest Mass (Bottom/Front)
+------------------------------------------+
Step 1: Clean and Evaluate Your Inventory
Empty your current storage areas and lay all your cutlery on a clean cutting board. Inspect each blade for chips, rust, or loose rivets. If a knife is permanently warped or uncomfortably dull, set it aside for professional sharpening or disposal.
Step 2: Establish Your Zones of Frequency
Place your block on your primary prep countertop, ideally between your main sink and your range. Orient the block so the handle openings point toward your dominant hand. Your most heavily utilized blade (typically an 8-inch Chef’s knife or Santoku) should occupy the top, most accessible slot.
Step 3: Distribute Mass and Weight Correctly
To prevent your block from becoming top-heavy and tipping over, place your longest, heaviest blades in the longest slots (usually at the top or back of the block). Smaller, low-mass items like paring knives or peeling tools should live in the smaller slots near the front or bottom.
Step 4: Accommodate Auxiliary Logistics
A truly organized culinary station also integrates supporting tools. Ensure your block configuration has dedicated ports for a ceramic or steel honing rod and heavy-duty kitchen shears. Keeping your honing rod in the block reminds you to re-align your blade matrix right before you make your first cut.
Advanced Maintenance and Hidden Risks
A storage block is a defensive shield for your knives, but if neglected, it can quickly become an incubator for problems.
| Block Material | Common Threat | Mitigation Protocol |
| Traditional Hardwood | Internal moisture trapping & mold | Never insert wet knives; clean slots bi-annually |
| Magnetic Face Blocks | Magnetic scratching from dust grit | Wipe face weekly with mineral oil and microfiber |
| Universal Bristle Blocks | Debris accumulation at base | Shake out bristles and wash in warm soapy water monthly |
Putting a wet or even slightly damp knife back into a traditional wooden slot is a recipe for disaster. The dark, unventilated, tight space traps moisture against the blade steel, causing microscopic pitting and rust. Over time, it can also breed mold deep inside the slot where you can’t reach it. Always towel-dry your cutlery completely before storage.
Scaling Up Your Kitchen Storage Strategy
Upgrading to a dedicated knife block is a high-yield home improvement project that instantly brings order to culinary chaos. Once your countertop logistics are optimized, turn your attention to other high-traffic zones in your kitchen. Consider installing soft-close drawer glides to eliminate wood-shattering vibrations, or add pull-out pantry organizers to keep your dry goods just as systematically arranged as your cutlery.
Did organizing your blades help clear up clutter on your kitchen counters or make cooking safer? What kind of storage setup do you prefer in your space? Let us know in the comments below, and share your favorite kitchen organization tips with our community!
